


Today,
Moodle is a widely used free-source eLearning application that is
also well-known as Course Management System, Learning Management and
Virtual Learning Environment.
This
high-end platform can be termed as education software on which you
can easily expand educational application without any hassle.
Moreover, Moodle can be used for alloyed learning, flipped classroom,
distance education and other e-Learning projects in schools,
workplaces, universities and other sectors.
If
you already use Moodle for your project of school, university,
institute and other eLearning sectors, you may want to give the best
look to your website that is possible with theme.
Developing
an effective and eye-catching Moodle theme becomes a lot easier with
us as here we have given a complete step-by-step guide for developing
a Moodle Theme. In this blog, you can find information on how to
develop a theme for Moodle 2.0 and Moodle 2.1.
Theme
Designer Mode -
Moodle
is one such platform that does a lot of things in terms of
performance under normal operation. One of these is to merge all the
CSS into one file, minimize it, cache it on the service and then
serve it. The cached version is served to mainly enhance page
performance after the first request.
After
making some of the changes, you are not able to see them immediately.
However, you need to tell Moodle platform to rebuild the cache, which
is serving. For designing themes, this was not practical, so the
theme designer mode was added. This mode tells Moodle not to mix or
cache the CSS when enabled as it gets delivered.
Get
Started -
Initially,
you have to do is to develop the directories and files that you will
be using. You have to create the real directory for your theme. It is
necessary that it must be the name of your theme and it is
excitement. Within the theme directory of Moodle, the directory must
be located. After that, in that directory, you can develop lots of
files that you will require.
Below,
you can find files that we wanted to create:
- config.php
- All of our settings will go here.
- /style/
- This directory will contain all of our stylesheets.
- /style/excitement.css
- All of our css will go in here.
- /pix/
- Into this directory we'll put a screen shot of our theme as well as our favicon and any images we use in CSS.
- /layout/
- Our layout files will end up in this directory.
- /layout/standard.php
- This will be our one basic layout file.
- /lang/en/
- The file we put here will make our theme name show properly on the Theme Selector page. You need a few standard entries. Copy the one from the Standard theme and modify is easiest.
-
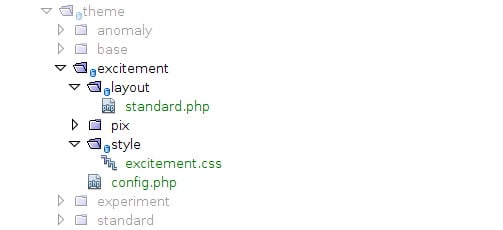
- You also need to have a directory structure that is similar to what is shown below after this setup step:
-
-
- Configuring our theme
-
- You need to open config.php in your favorite editor and have to start by adding the opening PHP tags<?php. Now, adding the settings:
-
- $THEME->name = 'excitement';
-
- It is extremely simple to tell Moodle the name of your theme, and if you ever have few config.php files open, it will be helpful for you to recognize that which one is best.
-
- Afterwards, the parents for this theme:
-
- $THEME->parents = array('base');
-
- It informs Moodle that my new theme “excitement” wanted to extend the base theme. A single has the capability to extend any number of themes. Instead of developing a fully new theme and copying all of the CSS, you just have to develop a new theme, widen the theme you like and add the changes that you are looking to add in your themes.
-
- However, the main aim of the base theme as it delivers us with a basic layout and enough CSS to make everything simple. Let's inform Moodle about our style sheets:
- $THEME->sheets = array('excitement');
-
- The final thing that need to add into theme's config.php file is the definition of the layouts for our theme.
Configuring The Language File
Open
theme_base.php file from base/lang/en/theme_base.php
Save
it as excitement/lang/en/theme_excitement.php
Change
$string['pluginname']
= 'Base';
to
$string['pluginname']
= 'Excitement';
Now,
the new theme name must be showed properly in the Theme Selector:Site
Administration > Appearance > Themes > Theme Selector
You
are also capable of editing the theme description.
$string['choosereadme']
=
'Write
your theme description here.';
In
place, you should leave the following two lines in order to avoid
notices while editing blocks etc.:
$string['region-side-post']
= 'Right';
$string['region-side-pre']
= 'Left';
Writing
The Layout File
However,
the excitement theme just has one layout file. The drawback of it is
that you have to make the layout file that foes everything while the
upside is that you only have to maintain one file.
Apart
from the maintenance, making use of multiple layout files deliver a
lot of advantages to actual world themes in which you can simply
tweak and customize particular layouts in order to achieve the goals
of the organization with the help of theme.
It
is also good to comprehend the two most important objects, which will
be used in your layout files: $OUTPUT and $PAGE before learning more.
Adding
Some CMS
Both
complete the theme is now usable and starting to look like a real
theme with config.php and standard.php. However, if you change it
using the theme selector, you can notice that it still lacks any
style. While writing code, Moodle developers pleased to not use
inline styles anywhere. It is a great as themers because there is
nothing in Moodle, which cannot be styled using CSS.
Moodle
CSS Basics
When
it comes to talking about the Moodle 2.0, all the CSS for the
complete Moodle is delivered. It was done due to performance reasons.
Now, Moodle is reading all of the CSS, mixing it into one file,
shrinking it removing any white space, caches it and delivers it.
Begin
to Write Excitement.css
For
the theme, it is not all of the CSS, but it is adequate to style the
front page when the user is not logged in. You also need to remember
that this theme expands the base theme, so there is already CSS for
layout.
Making
Use of Images within CSS
Now,
its time for adding image files to the pix directory of the theme. It
is must to add the background image for theme and header and headings
also.
Adding
a Screenshot and Favicon
However,
the main thing that needs to add both a screenshot for this theme and
a favicon for it. In the theme selector screen, the screenshot will
be shown and must be named as screenshot.jpg. When someone bookmarks
this page, the favicon can be used. Both images must be located in
your themes pix directory as follows:
- /theme/excitement/pix/screenshot.jpg
- /theme/excitement/pix/favicon.ico
So, above mentioned
complete step-by-step guide can help you to develop a perfect Moodle theme that best meet your requirements and deliver a right theme for
you.


Post a Comment